
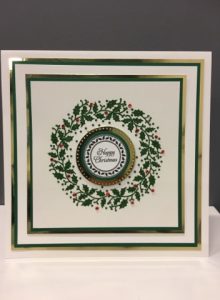
Project – Christmas Wreath stencil card – by Lucy Ellis
Kit List:
- SP2-146- Sweet Poppy Stencil: Christmas Wreath
- SPSTMP_BLESS – Sweet Poppy Stencil: A5 Stamp Set Christmas Blessings
- SPSD-TRANS – Stencil Dimensions: Translucent
- SP-SPREADER – Sweet Poppy:Spreader
- A5 Magnetic sheet – A5 Magnetic sheet
- Sweet Poppy Low tack Stencil tape – Stencil Tape Low Tack 25mm x 25m
- Sweet Poppy Satin Moss Green Glitter – Sweet Poppy Stencil: Satin Glitters Moss Green
- 300 gsm Cream card stock cut to sizes advised
- Green card stock cut to sizes advised
- Gold mirri card stock cut to sizes advised
- 1 – 8×8 Cream card blank
- Tiny red gems
- Vesafine black ink
Step 1: To start this iconic Christmas Wreath stencil card we need to cut our card stock to the following sizes either with a Square Die or a guillotine/trimmer. The sentiment circles are cut with a circle die. Now with your pieces of Cream , Green & Gold Mirri card stock cut to the following sizes.
- Cream card stock – 1 x 13.5cm x 13.5cm
- Green card stock – 1 x 14.5cm x 14.5cm
- Gold Mirri card stock – 1 x 15.5cm x 15.5cm
- Cream card stock – 1 x 17cm x 17cm
- Green card stock – 1 x 18cm x 18cm
- Gold Mirri card stock – 1 x 19cm x 19cm
- Cream Happy Christmas sentiment on a 4cm circle
- Green circle – 4.6cm diameter
- Gold mirri pierced circle – 5.7cm diameter
Step 2:
Lay your Cream card stock (13.5cm x 13.5cm) on top of the magnetic sheet and place the Christmas Wreath stencil on top and secure down with Stencil tape. Spread your Translucent Stencil Dimensions medium over the top of the stencil and remove the stencil, place the dirty stencil and tools into warm water to clean at the end.
Step 4:
Sprinkle your Moss Green Satin glitter completely over the wet image and tap the excess off on to a waste card or glitter tray.
Step 5:
Take a heat gun and gently dry the stenciled image taking care not to burn the card, the image will gently bubble as there is not much acrylic in the medium place to one side to allow to cool.
Step 6:
Stamp your circle sentiment (Happy Christmas) and die cut with a circle die, with the green and gold circles you have cut you can then build up the image by matting & layering.
Step 7:
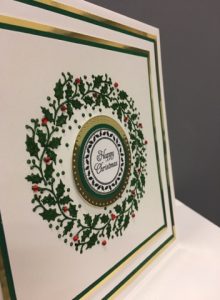
Mat and Layer your cream, green & gold card stock onto your 8 x 8 Cream card blank with either tape, wet glue or 3D glue/tape which ever is your preference, the final layer being the stenciled Christmas Wreath image.
Step 8:
Apply your gems but be careful not to over load the image, keep it simple and elegant.

Your project is complete !
Top Tips:
- Remember always use a magnetic sheet when using metal stencils because this will help provide a closer bond with the stencil to card stock.
- Start your medium on the tape and not the stencil and apply in one sweep, the more you work it the worse the image so apply once and remove excess once.
- Clean your stencil with warm soapy water and a nail brush this gets into all the small areas and avoids cutting fingers.
I hope you enjoyed this project please feel free to leave a comment or share with friends!
Lucy
Sweet Poppy Stencils
Stunning card