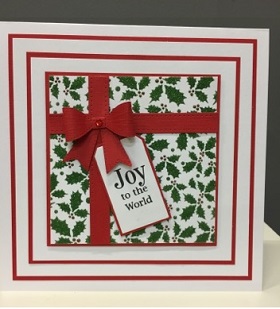

Project – Christmas Present card – by Lucy Ellis
Kit List:
- SP6-105 – Sweet Poppy Stencil: Holly Back Plate
- SPSTMP_NOEL – Sweet Poppy Stencil: A6 Stamp Noel
- SPSD-TRANS – Stencil Dimensions: Translucent
- SP-SPREADER – Sweet Poppy:Spreader
- A5 Magnetic sheet – A5 Magnetic sheet
- Sweet Poppy Low tack Stencil tape – Stencil Tape Low Tack 25mm x 25m
- Sweet Poppy Satin Moss Green Glitter – Sweet Poppy Stencil: Satin Glitters Moss Green
- CED1405 – Sue Wilson Finishing touches classic 3D bow
- 300 gsm White card stock cut to sizes advised
- Red card stock cut to sizes advised
- Sue Wilson Bow Die
- 1 – 8×8 White card blank
- Red liquid pearl drops
- Vesafine black ink
- 3mm red ribbon
Step 1:
Lets begin the Christmas Present Card by cutting your pieces of White & Red card stock cut to the following sizes either with a Square Die or a guillotine/trimmer, the sentiment circles are cut with a circle die.
- White card stock– 1 x 14cm x 210cm (this is your topper that will eventually be cut to 12cm x 12cm)
- Red card stock – 1 x 12.5cm x 12.5cm
- White card stock – 1 x 14.5cm x 14.5cm
- Red card stock – 1 x 15cm x 15cm
- White card stock – 1 x 17.5cm x 17.5cm
- Red card stock – 1 x 18cm x 18cm
- Scrap piece of red & white for the tag
- Scrap piece of red & white for the bow
Step 2:
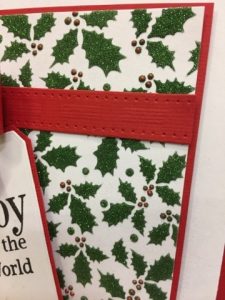
Lay your white card stock (14cm x 20cm) on top of the magnetic sheet and place the Holly backplate stencil on top and secure down with Stencil tape, then spread your Translucent Stencil Dimensions medium over the top of the stencil and remove the stencil.
Place the dirty stencil and tools into warm water to clean after the project is complete.
Step 3
Now sprinkle your Moss Green Satin glitter completely over the wet image and tap the excess off onto a waste piece of card or glitter tray and place to one side to dry.
Step 4:
When the image is dry brush off the residue glitter from the stencilled image then cut to a square 12cm x 12cm.
Step 5:
Apply your berries by adding with a cocktail stick or pokey tool tiny dots of red liquid pearls or glitter glue or gems but be careful not to over load the image, keep it simple and elegant.
Step 6:
Die cut your bow and bow strips and put the bow top together, (if you do not have a bow then you can use ribbon), ensure you put the strips down first on the Holly topper I have placed them off centre to allow the tag greeting to sit better.
(Your bow top is the last item to go on so finish off the rest of the card before being tempted to place this on.)
Step 7:
Mat and Layer your red and white card stock onto your 8 x 8 white card blank with either tape, wet glue or 3D glue/tape which ever is your preference, the final layer being the stencilled Holly square image that has the strips of the bow on it.
Step 8:
Stamp your verse or words on a piece of white card, I have used Joy to the World for mine and then cut a tag shape, cut a tag shape in red card but a little bigger than the white and then mat and layer it.
To complete the tag add a little hole at the top for the ribbon to go through and attach to the red cross on the card.

Step 9:
Finally place your Bow top on the cross and then add a red gem in the middle of the bow
Your Christmas Present Card project is complete !
Top Tips:
- Always use a Magnetic sheet when using metal stencils. This will help provide a closer bond with the stencil to card stock.
- Start your medium on the tape and not the stencil. Then apply in one sweep, the more you work the image the more chance of seepage under the stencil. So apply once and remove excess once.
- Clean your stencil with warm soapy water and a nail brush. This avoids cutting your fingers and gets into all the small areas.
I hope you enjoyed this project please feel free to leave a comment or share with friends!
Lucy
Sweet Poppy Stencils
Beautiful
Great detail on how to make this project. Good idea to have an “ingredient” list too. x