Heat Technique
Products required :
- Gold or Pearl White Stencil Dimension medium works best
- Sweet Poppy Mica Powder (this has no fixative or binder mixed with the mica so allows the medium to bubble)
- Snout nosed Heat Gun
- Anti-static bag
- Large brush for cleaning
- Stencil & Cardstock
Firstly, anti-static your card stock, this will stop the mica from sticking and help you get a clean finish.
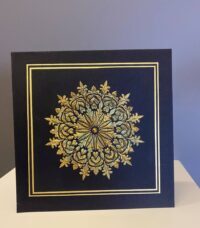
Take your stencil and place it in the centre of your card and secure it in place as usual, using your magnetic sheet and stencil tape.
Using the Gold or Pearl white Stencil Dimensions medium these work best with the heat. Apply the medium and then remove the stencil and place in a bowl of warm soapy water to clean at a later stage.
Place your freshly pasted image onto a piece of spare paper or kitchen roll to catch the excess mica powder, take a small paint brush and scoop a small amount of mica powder out of the pot and gently tap it over your pasted image, I like to do a few colours very random so I get a beautiful mix of colours.
Lift your image and gently tap it so the excess mica powder can fall off onto your piece of paper… this you can still use to fill in any gaps you may have missed on your pasted image, repeat this with the colours that are on your table until you are happy with your image… you won’t need to use much mica powder!
Give your image a good tap or flick over a bin to get all the excess mica off before you heat it.
Warm your heat gun up first before you go to your project then apply the heat directly to your your image … heating the paste while it is still wet will make it bubble leaving a nice effect. When you start to see it bubble move it along, do not waft the heat gun chase the bubbles as they appear, the may flatten when you remove the heat just go back over for a few seconds more and they will rise again.
Once completely dry allow to cool, then place over a clean dry cloth to trap the excess mica as you brush it off with a large brush this will also give your image a beautiful shine, clean your brush as you are working this helps to remove the excess mica.
Some of your bubbles will flatten.
Top Tips:
Take your heat gun, we prefer to use the snout nose heat gun rather than the hair dryer style heat gun as the snout nose ones are more direct with the heat.
Please visit our YouTube page to see the Heat Technique with mica powders.